Decoy
A Laravel model-based CMS
By Bukwild
Quick start
This guide walks you through using Decoy to create a simple news article listing for your site. It is assumed that you’ve already installed Decoy.
Step 1 - Database migration
Create a normal database migration to store your articles:
php artisan make:migration --create=articles create_articles
Create columns for title, slug, body, date, and public (whether it should be published publicly):
Schema::create('articles', function(Blueprint $table) {
  $table->increments('id');
  $table->string('title');
  $table->string('slug')->unique();
  $table->text('body');
  $table->date('date');
  $table->boolean('public');
  $table->timestamps();
  $table->index(['public', 'date']);
});
Run the migration: php artisan migrate.
Step 2 - Generate model, controller, and view

Decoy provides a generator that creates the controller, model, and view for the data you are managing. Run php artisan decoy:generate Article. This creates the following files:
app/Article- The model (shared by admin and public sites)app/Http/Controllers/Admin/Articles.php- The controllerresources/views/admin/articles/edit.haml.php- The view
Step 3 - Configure the model
You’ll notice that the generated model has a bunch of commented out code by default. That code represents common functionality and is there to help you get started. Edit it until it looks like this:
<?php namespace App;
use Bkwld\Decoy\Models\Base;
use Bkwld\Decoy\Models\Traits\HasImages;

class Article extends Base {
  use HasImages;

  /**
   * Add date fields
   *
   * @var array
   */
  protected $dates = ['date'];

  /**
   * Validation rules
   *
   * @var array
   */
  public static $rules = [
    'title' => 'required',
    'slug' => 'alpha_dash|unique:articles',
    'body' => 'required',
    'date' => 'required',
    'images.default' => 'required|mimes:jpeg',
    'images.marquee' => 'required',
  ];

  /**
   * Orders instances of this model in the admin as well as default ordering
   * to be used by public site implementation.
   *
   * @param  Illuminate\Database\Query\Builder $query
   * @return void
   */
  public function scopeOrdered($query) {
    $query->orderBy('date', 'desc');
  }

  /**
   * Return the URI to instances of this model
   *
   * @return string A URI that the browser can resolve
   */
  public function getUriAttribute() {
    return url('article', $this->slug);
  }

}
Let me expand on the key components of this file:
-
The model subclasses the Decoy base model (which in turn subclasses the Eloquent model).
-
The
HasImagestrait adds support for this model having images. -
We’re using standard Laravel model conventions to make our
datecolumn get automatically mutated into a Carbon instance. -
Laravel-style Validation rules get stored in the model in the static
$rulesproperty. -
The
orderedscope is a convention used by Decoy to specify the order that items should appear in the index, listing view for the model. -
Finally the
urimutator is another Decoy convention for specifying the deep link for this model on the public site.
For more information, see Models.
Step 4 - Configure the edit view
The create and edit form are both created by a simple Laravel view. The view file created by the generator is written in HAML but can be changed to php, blade, or anything else by just changing the file suffix. Change the edit view to this to create the fields required for our Article model.
!= View::make('decoy::shared.form._header', $__data)->render()

%fieldset
  .legend= empty($item) ? 'New' : 'Edit'
  != Former::text('title')
  != Former::image()
  != Former::image('marquee')
  != Former::wysiwyg('body')

%fieldset
  != View::make('decoy::shared.form._display_module', $__data)->render()
  != Former::date('date')->value('now')

!= View::make('decoy::shared.form._footer', $__data)->render()
For more information, see Views and Custom form fields.
Step 5 - Configure the controller
Like the model, the generated controller contains a number of commented out line and also subclasses a Decoy base class. The generated file is rather empty, it contains some protected properties that are used to configure aspects of the user interface for this specific resource. If you need to do something deeply custom, a developer can also override inherited methods for each CRUD.
Change your Article controller to:
<?php namespace App\Http\Controllers\Admin;
use Bkwld\Decoy\Controllers\Base;

class Articles extends Base {
  protected $title = 'News';
  protected $description = 'Articles that appear in the News section.';
  protected $columns = [
    'Title' => 'getAdminTitleHtmlAttribute',
    'Date' => 'date',
  ];
  protected $search = [
    'title',
    'date' => 'date',
  ];
}
This configuration renames how the resource is titles from its default “Articles” to “News”, defines a description that shows up in the header, configures what columns show up in the listing table, and configures how the fields available in the search.
For more information, see Controllers.
Step 6 - Add the public route
In order for the getUriAttribute() accessor to work, you must create the article route in your Laravel routes file:
Route::get('news/{slug}', ['as' => 'article', function($slug) {
  return view('news.show', ['article' => Article::findBySlugOrFail($slug) ]);
}]);
While doing that, you could stub out the listing view as well:
Route::get('news', ['as' => 'news', function() {
  return view('news.index', ['articles' => Article::listing()->paginate(12) ]);
}]);
Step 7 - Edit the Decoy navigation
Now, update the admin navigation to include “News”, the label for managing Article models. The contents of the navigation are stored in the config/decoy/site.php file. There is no need to setup any special routing definitions, this happens automatically.
<?php return [
  'name' => 'Your site',
  'nav' => [
    'News,align-left' => '/admin/articles',

    // Decoy defaults
    'Elements,leaf' => '/admin/elements',
    'Redirects,new-window' => '/admin/redirect-rules',
  ],
];
The align-left defines an icon to use in the navigation sidebar. These can be any of the Bootstrap Glyphicon names.
Step 8 - Create an admin account
Create yourself an admin account by running php artisan decoy:admin in the console and answering its prompts.

Step 9 - Login and start creating content
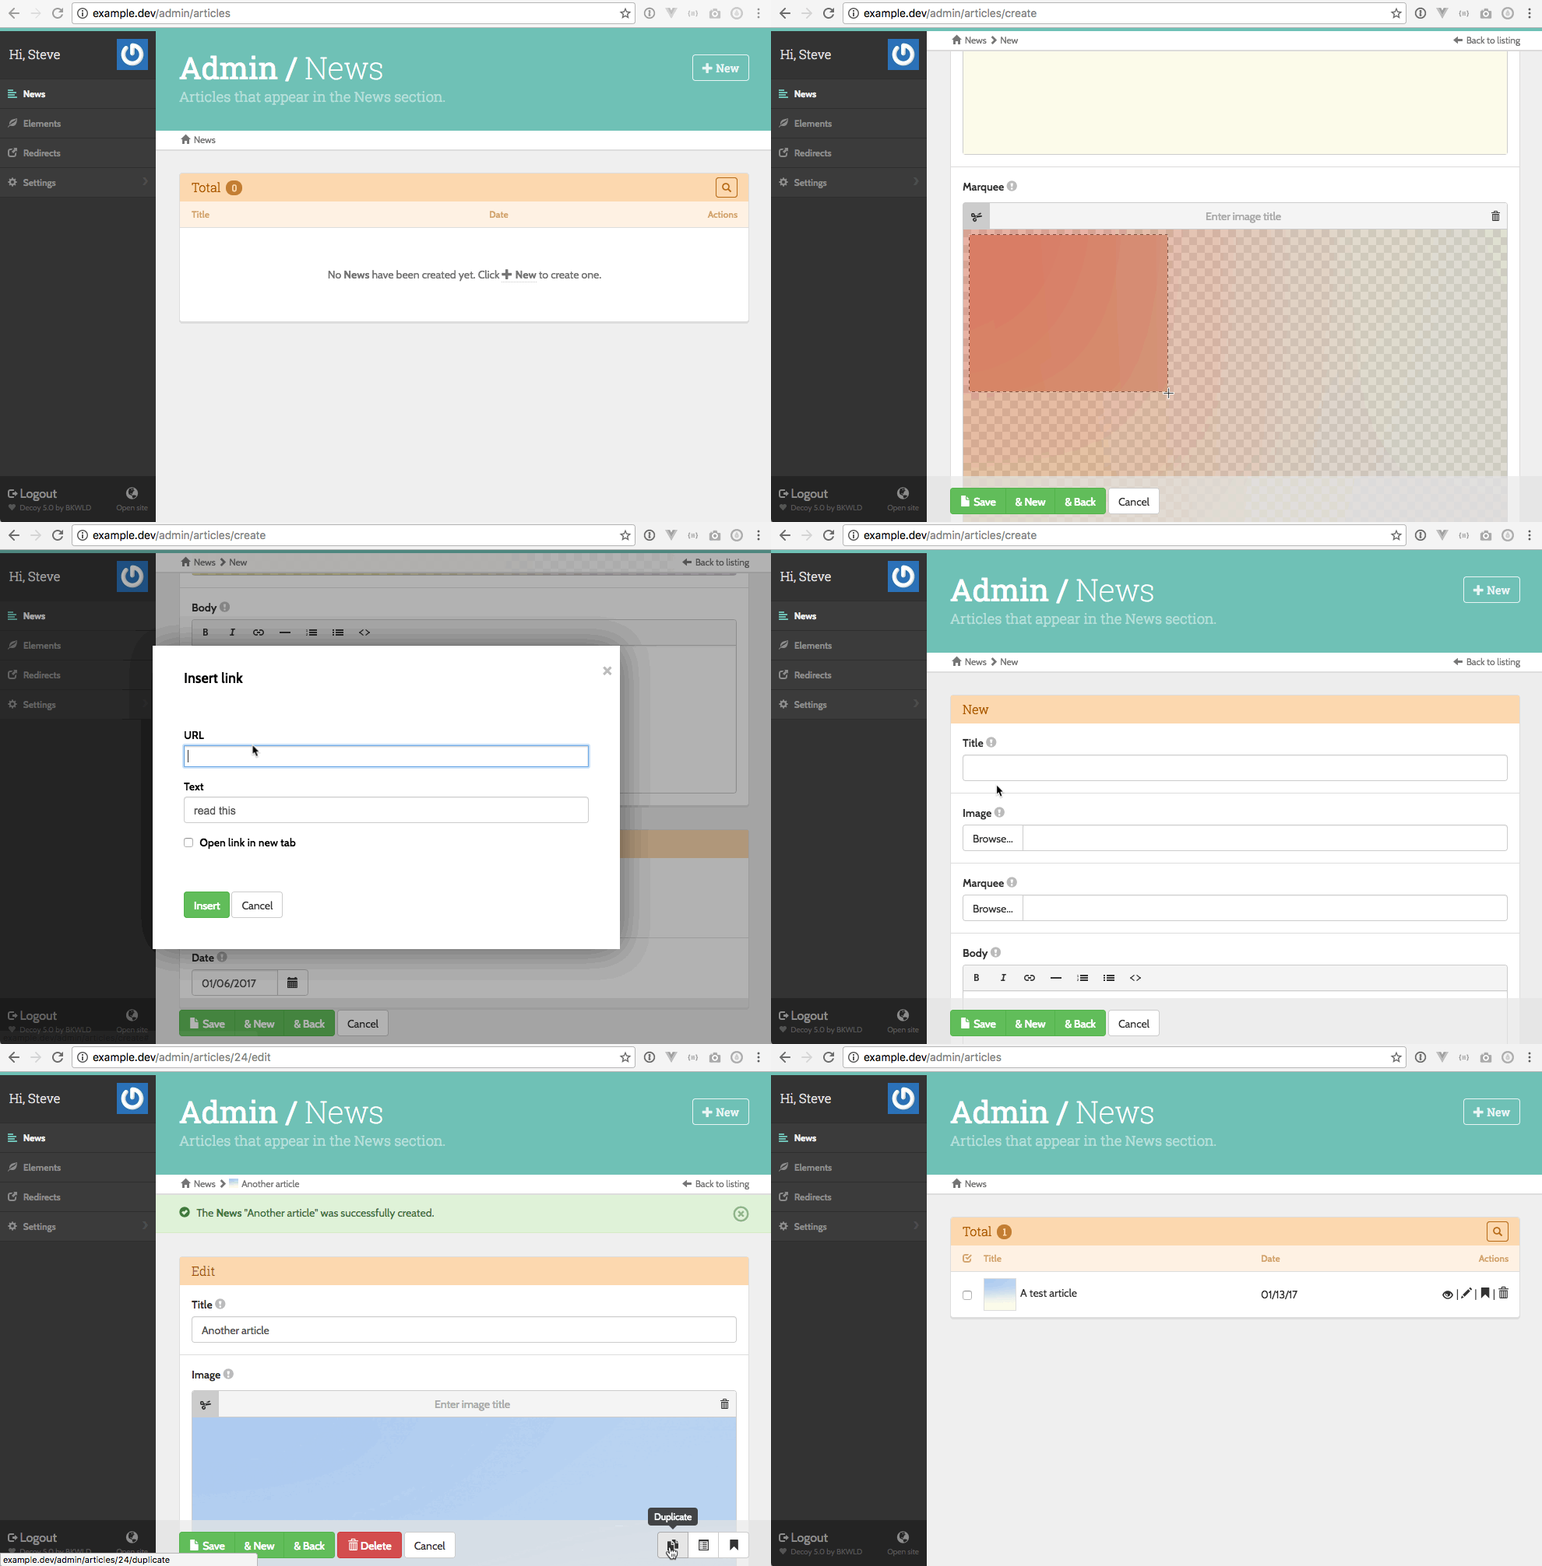
Finally, you can go to /admin in your browser (for whatever your development domain is) and login using the credentials you just used to create an initial account. You should be seeing the following:
